Windows 7 and Windows Server 2008
Note
While ownCloud will run in any standard PHP environment, including IIS or Apache on Windows, there are known issues. For the basic sync and share capabilities of ownCloud, Windows web servers (Apache and IIS) will function properly. However, as apps like external storage are added, particularly SMB mounts, and non-English characters are used in filenames, some of the known Windows and IIS/Apache challenges start to appear as bugs.
ownCloud is not supported on the Internet Server Application Programming Interface (ISAPI).
Microsoft SQL Server is not supported.
For these reasons, while ownCloud server will run on Windows, it is not recommended at this time.
Note
You must move the data directory outside of your public root (See advanced installation settings)
This section describes how to install ownCloud on Windows with IIS (Internet Information Services).
These instructions assume that you have a standard, non-IIS enabled Windows machine using Windows 7 or Server 2008. After enabling IIS, the procedures are essentially identical for both Windows 7 and Windows Server 2008.
For installation, ownCloud physical access or a remote desktop connection is required. We recommend that you leverage MySQL as the backend database for ownCloud. If you do not want to use MySQL, you can use Postgres or SQLite instead. However, Microsoft SQL Server is not yet supported.
Enabling SSL is not yet covered by this section.
Note
If you make your desktop machine or server available outside of your LAN, you must maintain it. Make sure to monitor the logs, manage the access, and apply patches to avoid compromising the system as a whole.
There are four primary steps to the installation, and then an added fifth step required for configuring everything to allow files larger than the default 2 MB size.
- Install IIS with CGI support – enable IIS on your Windows machine.
- Install PHP – Grab, download and install PHP.
- Install MySQL – Setup the MySQL server manager and enable ownCloud to create an instance.
- Install ownCloud – The whole reason we are here!
- Configure upload sizes and timeouts to enable large file uploads – So that you can upload larger files.
Activate IIS with CGI Support
Windows 7
To activate IIS on Microsoft Windows 7:
- Navigate to Start –> Control Panel –> Programs.
- Under Programs and Features, click on the link entitled Turn Windows Features on and Off.
- Expand the box labeled Internet Information Services.
- Expand World Wide Web Services and all of the folders beneath it.
- Select the folders as shown in the image below to launch the IIS server.
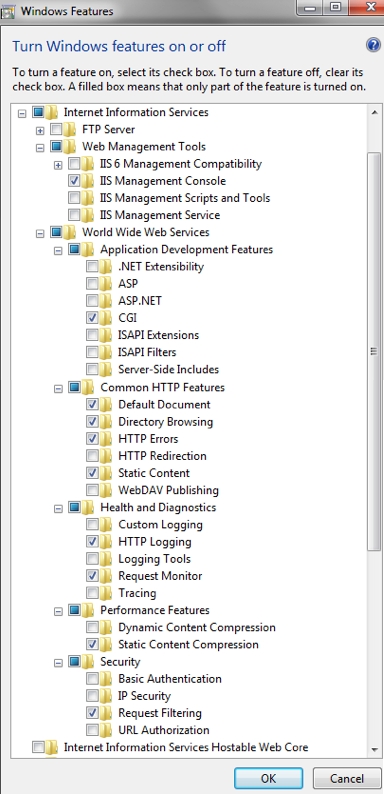
Windows Features required for ownCloud on Windows 7
Because a running FTP server is not required, turn off that feature for your server.
Ensure that you have the IIS Management Console. An IIS management console is the easiest way to start, stop, and restart your server. This console also enables you to change certificate options and manage items like file upload size.
Check the CGI checkbox under Application Development Features in order to enable PHP on IIS.
Turn off WebDAV publishing to avoid conflicts between the Windows WebDAV and the ownCloud WebDAV interface.
Note
This feature might already be turned off for you. However, we recommend that you ensure that it remains off. The common HTTP features are the features you would expect from a web server.
After implementing the selections on this page, IIS serves up a web page.
Restart IIS by going to the IIS manager (Start –> IIS Manager).
Select your website.
On the far right side of the opening page you will see a section titled Manage Server.
Make sure that the service is started, or click Start to start the services selected.
Go to a web browser and navigate to http://localhost.
The standard IIS 7 splash page opens. This page displays a static image that indicates that your web server is running. Assuming you were able to reach splash page, your web server is now up and running.
Continue by installing PHP.
Windows Server 2008
- Navigate to Start –> Control Panel –> Programs.
- Under Programs and Features, click the link titled Turn Windows Features on and Off. The Server Manager starts.
- In the Server Manager, click Roles
- Click Add Roles.
- Use the Add Roles Wizard to add the web server role.
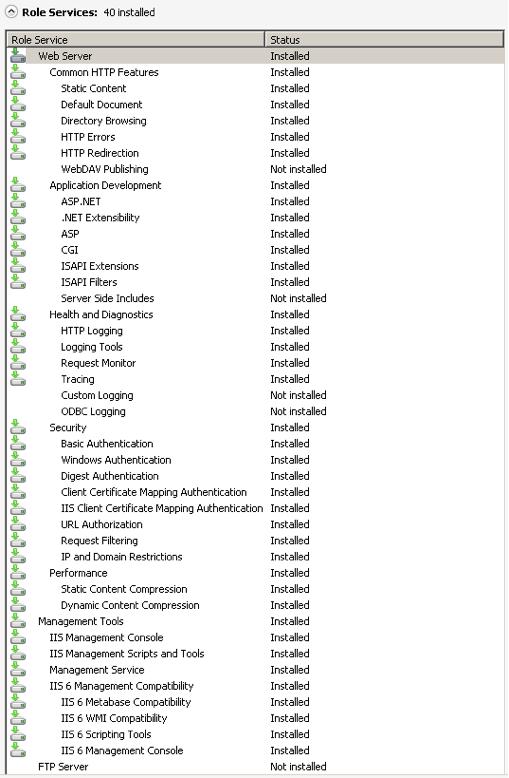
Server roles required for ownCloud
- Make sure that, at a minimum, the same boxes are checked in this wizard that are checked in the Windows 7 Section. For example, make sure that the CGI box is checked under Application Development Features, and that WebDAV Publishing is turned off. With Remote Desktop Sharing turned on, the detailed role service list looks like the figure “Role Services”.
- Go to the IIS manager (Start –> IIS Manager) and restart IIS.
- Select your website
- Once this is complete, you should be able to go to a web browser and type localhost. This should open the standard IIS 7 splash page, which is just a static image that says your web server is running. Assuming you were able to get the splash page, it is safe to say your web server is now up and running.
Continue by installing PHP.
Installing PHP
- Go to the PHP for Windows download page.
Note
The instructions below are for IIS only. If using a different server software, make sure to follow the hints on “Which version do I choose” on the left hand side of the page linked above.
- Download the Installer for PHP 5.3, the “VC9 Non Thread Safe” version, either 32 or 64 bit, depending on your system.
- Run the downloaded installation executable.
- Read the license agreement, agree, select an install directory.
- Then select IIS FastCGI as the install server.
- Take the default selections for the items to install, and click next. Then click install.
- Once the installer is finished, PHP is installed.
Continue by installing MySQL.
Installing MySQL
To install MySQL on your Windows machine:
Use your browser to migrate to http://dev.mysql.com/downloads/.
Download the latest community edition for your operating system, choosing either the 32 or 64 bit version as applicable.
Download the MSI Installer to assist with the install.
Once the download completes, install MySQL (5.5 at the time of writing), selecting the typical installation.
Once the installation completes, check the checkbox to launch the MySQL Instance Configuration Wizard and click Finish.
Select a standard configuration, as this will be the only version of MySQL on this machine.
Select the option to install as a windows service, and Check the Launch the MySQL Server Automatically button.
Select the modify security settings checkbox on the next page, and enter a password.
Note
Make sure to note your chosen password. You will need this password when you configure ownCloud.
Uncheck enable root access from remote machines for security reasons.
Click execute. The instance is created and launched.
Once the instance launches, click Finish.
Take particular note of your MySQL password, as the user name root and the password you select will be necessary later on in the ownCloud installation. As an aside, the following link is an excellent resource for questions on how to configure your MySQL instance, and also to configure PHP to work with MySQL. This, however, is not strictly necessary as much of this is handled when you download ownCloud.
More information in this topic can be found in a tutorial on the IIS web site.
http://learn.iis.net/page.aspx/353/install-and-configure-mysql-for-php- applications-on-iis-7-and-above/
Installing ownCloud
Download the latest version of ownCloud from http://owncloud.org/download. The file is downloaded in tar.bz2 format.
Unzip the file and save it locally.
Note
You can use jZip for a free utility (like Peazip) to unzip the file.
Copy the file to your wwwroot directory (for example, C:\inetpub\wwwroot).
Note
Only the administrator can install directly into the directory wwwroot from an unzipping application. However, you can save the file in a different folder and then move the files into wwwroot in windows explorer. This process installs ownCloud locally in your root web directory. You can use a subdirectory called owncloud (or whatever name you choose).
To enable write access to the ownCloud directory to the ownCloud server, navigate your windows explorer to inetpub/wwwroot/owncloud (or the installation directory you selected).
Right click and select properties.
Click the security tab, and select the button “to change permissions, click edit”.
Select the “users” user from the list, and check the box “write”.
Apply these settings and close the window.
Continue by following the Installation Wizard. Select MySQL as the database, and enter your MySQL database user name, password and desired instance name – use the user name and password you setup during MySQL installation, and pick any name for the database instance.
Ensure Proper HTTP-Verb Handling
IIS must pass all HTTP and WebDAV verbs to the PHP/CGI handler, and must not attempt to handle them by itself or syncrhonizing with the Desktop and Mobile Clients will fail.
To ensure your configuration is correct:
- Open IIS Manager7.
- In the Connections bar, select your site below Sites, or choose the top level entry if you want to modify the machine-wide settings.
- Choose the Handler Mappings feature.
- Click PHP_via_fastCGI.
- Choose Request Restrictions and locate the Verbs tab.
- Ensure All Verbs is checked.
- Click OK.
Choose the Request Filtering feature from the IIS Manager.
Ensure that all verbs are permitted (or none are forbidden) in the Verbs tab. You need to allow the verbs GET, HEAD, POST, OPTIONS, PROPFIND, PUT, MKCOL, MKCALENDAR, DELETE, COPY, and MOVE.
Note
Because ownCloud must be able to use WebDAV on the application level, you must also ensure that you do not enable the WebDAV authoring module.
Configuring ownCloud, PHP and IIS for Large File Uploads
Before you begin to use ownCloud heavily, it is important to make a few configuration changes to enhance the service and make it more useful. For example, you might want to increase the max upload size. The default upload is set to 2MB, which is too small for many files (for example, most MP3 files).
To adjust the maximum upload size, you must access your PHP.ini file. You can locate this file in your C:\Program Files (x86)\PHP folder.
To adjust the maximum upload size, open the PHP.ini file in a text editor, find the following key attributes, and change them to what you want to use:
- upload_max_filesize – Changing this value to something like 1G will enable you to upload much larger files.
- post_max_size – Change this value to be larger than your max upload size you chose.
You can make other changes in the PHP.ini file (for example, the timeout duration for uploads). However, most default settings in the PHP.ini file should function appropriately.
To enable file uploads on the web server larger than 30 MB, you must also change some settings in the IIS manager.
To modify the IIS Manager:
Go to the start menu, and type iis manager. IIS manager launches.
Select the website that you want to accept large file uploads.
In the main (middle) window, double click the icon Request filtering. A window opens displaying a number of tabs across the top.
Select Edit Feature Settings
Modify the Maximum allowed content length (bytes) value to 4.1 GB.
Note
This entry is in bytes, not kilobytes.
You should now have ownCloud configured and ready for use.